Touchdesigner Tutorial/Network Walkthrough: Audio-Reactive Ripples
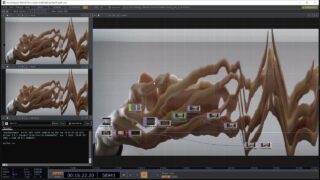
PLEASE NOTE: This is a live-stream style walkthrough of an existing network to show the post-render ripple effect described in the title, NOT a standard build-it-from-scratch tutorial. The pre-render input can be anything. It also doesn’t have to use a render network at all. This effect works on 2D textures too. The key elements are a feedback loop containing a level TOP (opacity slightly reduced), and a displace TOP, running into a composite TOP set to Over or Add (Add tends to be brighter). To get the ripples we attach the level TOP to both inputs on the displace TOP and then insert a slope and a blur in the second input’s chain. You either need relatively high displacement (0.2-1) and low slope strength (less than 4) or low displacement (0.001-0.01) and high slope strength (greater than 100) to get the ripples to start appearing. The blur controls the level of detail.
I’ve used this technique on several A/V collaborations and it continues to satisfy, so it seemed like a good place to start my tutorial series. You can view the effect in the first 30 seconds or so of the video.
Project files are available on my Patreon https://www.patreon.com/owsley_wylyfyrd to mid-tier at up.


![[TouchDesigner]particles GPU, feedback effects](https://alltd.org/wp-content/uploads/2024/03/touchdesignerparticles-gpu-feedb-320x180.jpg)