Touchdesigner & Polycam Point Clouds: Pt. 2 The Energy Wave Effect
Welcome to part 2 of my series on creating Point Clouds with Polycam and Touchdesigner! Part 1 was an easy(ish) method to scan a room, object, or just about anything else with an app called Polycam, and turn it into a point cloud in Touchdesigner. The next parts will be how to manipulate those point clouds once they’re created. I highly recommend watching Part 1 first if you aren’t familiar with the workflow! Here’s the link: https://youtu.be/LXjfxJbTkn4
As Always, project files for this and all other tutorials are available on my Patreon: https://www.patreon.com/owsley_wylyfyrd
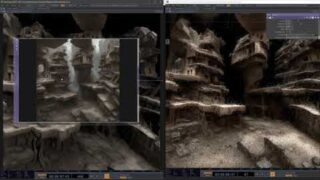
Using any lidar-equipped smartphone (I use an iPhone 13 Pro Max in the example video) and the Polycam App you can scan anything in your environment and use that data to create beautiful point cloud artwork in Touchdesigner. I scanned a sculpture by itself using Photogrammetry Mode, and my entire living room using LiDAR Mode. See Part 1.
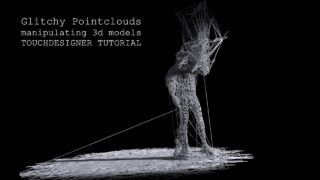
This tutorial covers a technique called masking that allows us to manipulate some parts of the cloud but not others. The end result is this “energy wave” passing through our points.
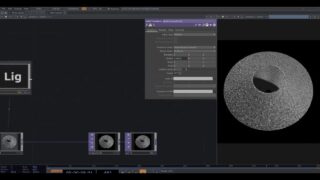
I cover some concepts needed to understand changing a 2D image to manipulate its projection into 3D space. It’s a little bit of a confusing concept, which is why I wanted to spend some time on it. Getting a thorough understanding of RGB info being used to generate XYZ (Cartesian) coordinates will open the entire world of what can be done with point clouds.
![Realtime Audioreactive Pointclouds v1.5 – [TouchDesigner + Kinect | Project Files]](https://alltd.org/wp-content/uploads/2023/07/realtime-audioreactive-pointclou-100x75.jpg)
About The Author
You might be interested in


![Realtime Audioreactive Pointclouds v1.5 – [TouchDesigner + Kinect | Project Files]](https://alltd.org/wp-content/uploads/2023/07/realtime-audioreactive-pointclou-320x180.jpg)