TouchDesigner Tutorial: Create a Procedural Layered Grid with POPs (Easy)
In this TouchDesigner tutorial, we build a complex, procedural, layered composition that blends 2D glitch aesthetics with 3D depth. We use the POP family to convert texture data into high-density architectural grids, creating a system that behaves like a living data organism. You will learn to structure multi-layered geometry using Top to POP, Copy POP, and LFO CHOP scripts to automate motion across five distinct layers. Download the fully Project File on Patreon.
*Download Project File*
◼️Project Files Patreon ⇨ https://okamirufu.com/go/projects?utm_source=youtube&utm_medium=video_description&utm_campaign=new_tutorial
*Free Resources*
◼️Free VJ Pack ⇨ https://okamirufu.com/go/freevj?utm_source=youtube&utm_medium=video_description&utm_campaign=new_tutorial
*Courses & Education*
◼️TouchDesigner Ultra Bundle 👀 ⇨ https://okamirufu.com/go/ultra?utm_source=youtube&utm_medium=video_description&utm_campaign=new_tutorial
◼️TouchDesigner Courses ⇨ https://okamirufu.com/go/skool?utm_source=youtube&utm_medium=video_description&utm_campaign=new_tutorial
*Creative Tools*
◼️Blob Tracking Web ⇨ https://okamirufu.com/go/blobs?utm_source=youtube&utm_medium=video_description&utm_campaign=new_tutorial
◼️The Mesher Waiting List ⇨ https://okamirufu.com/go/mesher?utm_source=youtube&utm_medium=video_description&utm_campaign=new_tutorial
*Connect*
◼️Patreon ⇨ https://okamirufu.com/go/patreon?utm_source=youtube&utm_medium=video_description&utm_campaign=new_tutorial
◼️Instagram ⇨ https://okamirufu.com/go/instagram?utm_source=youtube&utm_medium=video_description&utm_campaign=new_tutorial
◼️TikTok ⇨ https://okamirufu.com/go/tiktok?utm_source=youtube&utm_medium=video_description&utm_campaign=new_tutorial
◼️Pinterest ⇨ https://okamirufu.com/go/pinterest?utm_source=youtube&utm_medium=video_description&utm_campaign=new_tutorial
● – – – – – – – – – – – – – – – – – – – – – – – – – – – – – ●
*TIMECODE*
00:00 *Tutorial Introduction*
Welcome to the Superfast TouchDesigner tutorial series.
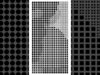
We start by building a modern data-driven glyph dither effect.
00:30 *Network Overview*
Analyze the three main layers driving the rectangular glyphs and circles.
The system uses noise to fill negative space with organic shapes.
01:09 *Setting Global Scale*
Create a Constant CHOP to define the global grid proportions.
This ensures all symbols and shapes remain perfectly aligned throughout.
01:35 *Building First Layer*
Create a Noise TOP with nearest pixel sampling for hard edges.
Connect the texture to a TOP to POP to convert pixels into points.
03:07 *Instancing Rectangles*
Use a Copy POP to place rectangles on every valid point of the grid.
Add a Lookup Texture POP with a Ramp TOP for custom color mapping.
04:32 *Creating Inverse Circles*
Reference the original noise and use a Level TOP to invert the pattern.
Replace the rectangles with Circle POPs to fill the negative gaps.
05:25 *Adding Detail Crosses*
Generate a third layer of cross-shaped glyphs for fine detail pass.
Merge multiple Rectangle POPs and use a Transform POP for scale.
06:47 *Final Rendering Setup*
Configure an Orthographic Camera and Render TOP for a flat graphic look.
Set the pixel format to 32-bit float for high-quality black and white.
● – – – – – – – – – – – – – – – – – – – – – – – – – – – – – ●
*Subscribe to stay updated on Future Tutorials*
Stay Strong & Make Art 🤍 With Love Okamirufu
#touchdesigner #creativeposter #posterdesign #realtime #generativeart